How to set up audio streaming (internet radio) in Linux
This tutorial will show how to go live with an internet radio station in a few minutes.
An “audio stream” is nothing more than a HTTP request that never finishes.
In order to broadcast audio (e.g. internet radio) into the internet, you need
- a remote streaming server with high bandwidth to which many clients can collect
- a local stream generator, which is sending a single stream to the streaming server
The following tutorial shows how you can easily achieve this with free and open source tools which are part of the Debian (Ubuntu) distributions. It will take you 15 minutes to start your first rudimentary broadcast.
We will use Icecast2 as a streaming server, simply for the reason that it is part of the Debian distribution and that I got it to work immediately. As the local stream generator we will use darkice, for the same reasons.
Why not Windows? Well, since the majority of remote servers are running Linux distributions, you can use Icecast2 anyway. If you want to use a different stream generator for Windows, you can do so. This screencast shows you how it’s done.
Icecast2
Is Icecast a professional-grade solution? According to a blog,
Very much so. ICEcast is an industry standard platform used by thousands and thousands of radio stations all over the world. Its wide compatibility means people can listen with most players and operating systems.
Listeners will be able to connect to your MP3 stream from all over the world, with all the popular media players including Windows Media Player, iTunes, Winamp, Realplayer, XMMS, and many more media players besides.
Although incredibly simple, it can cope with even the heaviest demands and will not break under pressure. Its simplicity works to the broadcaster and listeners favor.
According to Wikipedia,
Version 2 [of Icecast] was started in 2001, a ground-up rewrite aimed at multi-format support (initially targeting Ogg Vorbis) and scalability.
This certainly sounds like good news! So, let’s dive in!
You would do the following steps on a server which is located at a large internet node with enough bandwidth to serve all your audience. Installation is simple:
apt-get install icecast2
During the installation you will be asked if you want to configure Icecast2. Answer yes. You will be asked the hostname. Here simply leave the default “localhost”. Next, you will be asked for source, relay and administration passwords. For testing, leave “hackme”. If you want to change the configuration at a later point, edit the configuration file /etc/icecast2/icecast.xml
Next, you have to enable the Icecast2 server by setting ENABLE in the configuration file /etc/default/icecast2 to true.
Now, start the server:
service icecast2 start
You now can access the web admin interface on port 8000 of your machine:
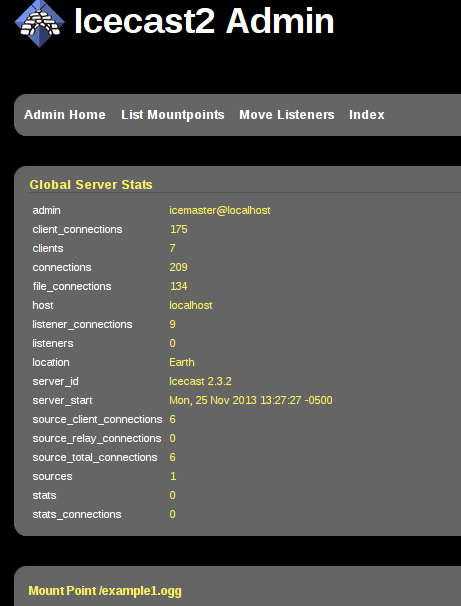
The log file is in /var/log/icecast2/error.log and access.log . Best to tail -f both files to observe what is going on.
Darkice
Darkice is a stream generator. It encodes audio into various formats (e.g. ogg, mp3, etc.) from various inputs (e.g. microphone jack, line-in jack, or the stereo mix of your operating system) and sends a single stream to our Icecast2 server, which in turns re-broadcasts it to all connected clients.
To install, simply type:
apt-get install darkice
By default it does not install a configuration file. But there is an example in the documentation. Copy this to the /etc directory:
cp /usr/share/doc/darkice/examples/darkice.cfg /etc
You will need to edit this file according to your needs. Here is an example that worked for me:
# this section describes general aspects of the live streaming session

[general]
duration = 0
bufferSecs = 5
reconnect = yes

[input]
device = default
sampleRate = 44100
bitsPerSample = 16
channel = 2

[icecast2-0]
bitrateMode = abr
format = vorbis
bitrate = 96
server = 192.168.0.250
port = 8000
password = hackme
mountPoint = example1.ogg
name = DarkIce trial
description = This is only a trial
url = http://www.yourserver.com
genre = my own
public = yes
localDumpFile = dump.ogg
Make sure that the password and the IP address of the Icecast2 server (which we installed earlier on the other machine) match. Also, remember the mountPoint of this stream. This is simply a label, in my case it is “example1”. Then you simply run as normal user:
darkice
It is a console-only application and you will see some messages. This is what I get:
DarkIce 1.0 live audio streamer, http://code.google.com/p/darkice/
Copyright (c) 2000-2007, Tyrell Hungary, http://tyrell.hu/
Copyright (c) 2008-2010, Akos Maroy and Rafael Diniz
This is free software, and you are welcome to redistribute it
under the terms of The GNU General Public License version 3 or
any later version.

Using config file: /etc/darkice.cfg
Using ALSA DSP input device: default
Could not set POSIX real-time scheduling, this may cause recording skips.
Try to run darkice as the super-user.
The note about the realtime stuff is just a warning, it works nevertheless. It would be easy to run it as superuser.
Making a simple stream player
We will simply make a small website with one
<html>
	<body>
		<audio controls>
			<source src="http://192.168.0.250:8000/example1" />
		</audio>
	</body>
</html>
Make sure that the IP address corresponds to the server where the Icecast2 server is running on. Open this html file in a browser and click the play button. Now you should hear the same audio that the darkice client has as its input.
Changing the audio input for darkice
In case you don’t have the Pulse Audio Volume control installed, install it with
apt-get install pavucontrol
Then run it.
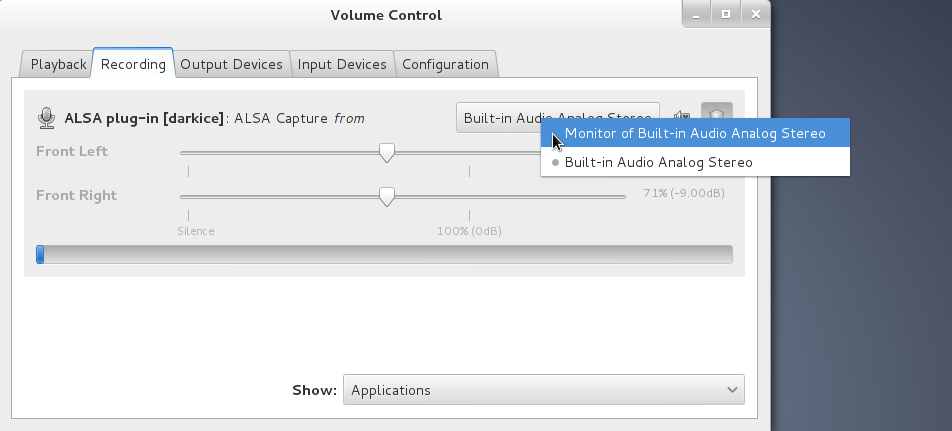
As soon as you have darkice running, the “Recording” tab will show the text “ALSA plug-in [darkice]: ALSA Capture from …”
From the drop down you can select the input source. The text is a bit misleading. In my case “Monitor” means the stereo-mix of the entire computer (e.g. all system sounds, all played back audios). “Built-in Analog Stereo” means the microphone / line-in jack.
For professional radio applications you of course would not use such a simple software mixer, but have an external hardware-based mixer to which all the microphones and the line-out of your computer are attached. Then you would connect the final output of the hardware mixer to your computer line-in and select “Built-in Analog Stereo” for darkice’s input.
Linux has a more professional audio system called Jack as a replacement for the standard system Pulse Audio (we were using Pulse Audio in the above tutorial, which is similar to what Windows uses). Both are running on the Linux Kernel’s sound system called ALSA.
Conclusion
In the face of tons of documentation and blogs in the internet it is surpirisingly easy to set up your own, simple internet radio station with zero investment, all thanks to Open Source.