Teamviewer alternative: How to get a Remote Desktop VNC connection via SSH over an intermediate server, avoiding firewalls
Teamviewer-like products are so popular because they solve a real problem: To connect from one machine to another is not straightforward because we all use regular modems/routers to connect to the internet. These use NAT and are usually not set up for Port Forwarding. In layman’s terms this means: You can initiate a connection to ‘the internet’, but ‘the internet’ never can initiate a connection to you. This quandary has only one solution: an intermediary is needed. Teamviewer-like products all offer such intermediary servers. Data is never directly sent from one computer to the other. Data is passed through a server.
For this article, I’ve decided to make an image gallery so that you can see easier what is going on behind the scenes. Running just 4 commands will do the trick!
The following list and image shows the starting point of our scenario:
- We are sitting in front of the computer called “sittinghere”.
- We want to see the screen of the computer called “overthere”.
- There is a server called “hopper” which runs an ssh daemon (sshd) listening on the standard port 22. Our data will ‘hop’ though there, hence the name “hopper”.
The initial situation: Regular firewalls are constrict “sittinghere” and “overthere”. “hopper” has a firewall with only port 22 open.
We instruct our friend, sitting in front of the computer “overthere”, to start any kind of VNC server. There are many products for Windows, Mac OS, and Linux available. I’m using Linux and decided for x11vnc because it allows access to the screen of the currently logged in user instead of starting a new user session. The command is:
x11vnc -nap -noxdamage -passwd PASSWORD -display :0 -forever -bg
After this command, our situation has changed. See the following image. The VNC server has started listening on port 5900 (see lower right corner):
Now we have to instruct our friend, sitting on “overthere”, to run a ssh command to connect to “hopper”. You can make a little batch script for this to make it more convenient, but this is not the focus of this article. The command is:
ssh -R 7001:localhost:5900 hop@hopper.com
With this command, sshd on “hopper” is instructed to create a socket on port 7001. And when someone connects to this port, it will be as if the same connection had been made on “overthere” port 5900. In the code above, “localhost” refers to the computer “overthere” because the command is executed on this computer.
Let’s see how our situation now looks like:
Now that “overthere” has done its connection to “hopper”, it is time for “sittinghere” to connect to “hopper” too. Here is the command:
ssh -L 7002:localhost:7001 hop@hopper.com
This means: A socket on port 7002 will be created on localhost (“sittinghere”). If someone connects to this port, it will be as if the same connection had been made on port 7001 on “hopper”. Here’s the new situation:
Remember that a connection to port 7001 on “hopper” will have the same effect as if the same connection had been made on “overthere”. This means we will have a kind of ripple-through effect: As soon as we connect to port 7002 on “sittinghere”, the connection will ripple through until it connects to port 5900 of “overthere”. And this endpoint is our VNC server.
Now let’s connect with a VNC client from “sittinghere” to “overthere”. You will find lots of good VNC clients in the internet. Just connect to localhost:7002 which is equivalent to 127.0.0.1:7002.
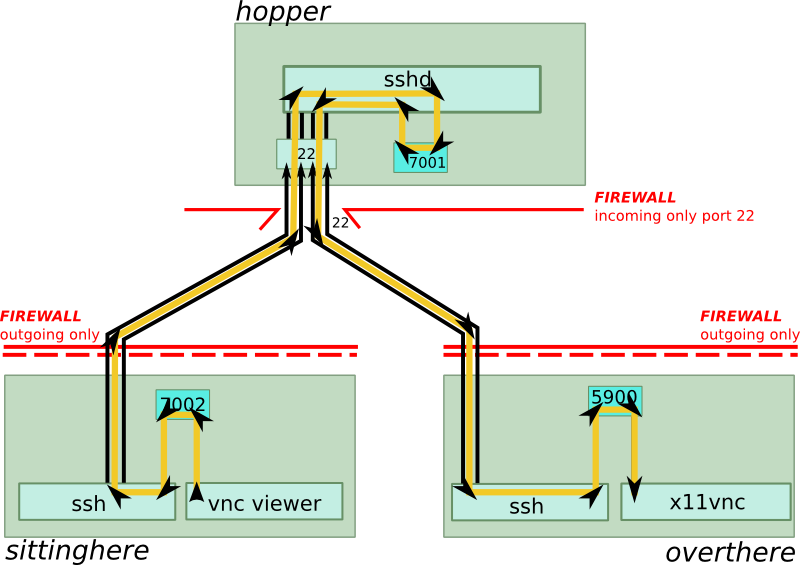
This will start our connection cascade, and the final situation looks like this:
Congratulations, we’re now all connected through! If you have set a password (we’ve set it to “PASSWORD” in the above example), you now will see the remote screen. Note that we didn’t even have to execute a command on “hopper”, nor even reconfigure any firewall! My experience is that the quality and speed of the transmitted remote image is very good.
The SSH connections will stay alive until you terminate them. So, just type “exit” in the ssh terminals opened at “sittinghere” and “overthere” that we have been opened previously (to “hopper”).