Digitize books: Searchable OCR PDF with text overlay from scanned or photographed books on Linux
Here is my method to digitize books.
It is a tutorial about how to produce searchable, OCR (Optical Character Recognition) PDFs from a hardcopy book using free software tools on Linux distributions.
You probably can find more convenient proprietary software, but that’s not the objective of this post.
Digitize books
To scan a book, you basically have 2 choices:
- Scan each double page with a flatbed scanner
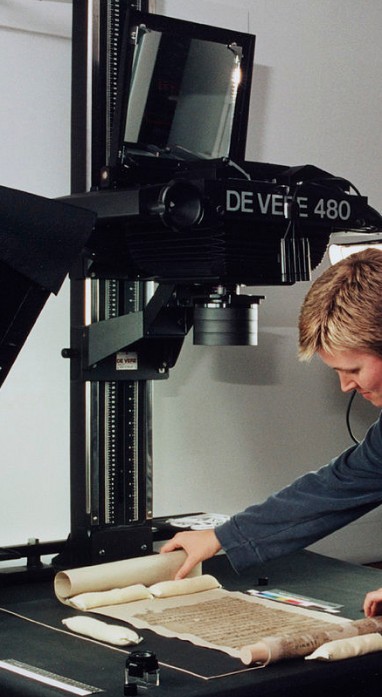
- Take a good photo camera, mount it on a tripod, have it point vertically down on the book, and then take photos of each double page. Professional digitizers use this method due to less strain on the originals.
No matter which method, the accuracy of OCR increases with the resolution and contrast of the images. The resolution should be high enough so that each letter is at least 25 pixels tall.
Since taking a photo is almost instant, you can be much faster with the photographing method than using a flatbed scanner. This is especially true for voluminous books which are hard to repeatedly take on and off a scanner. However, getting sharp high-resolution images with a camera is more difficult than using a flatbed scanner. So it’s a tradeoff that depends on your situation, equitpment and your skills.
Using a flatbed scanner doesn’t need explanation, so I’ll only explain the photographic method next.
Photographing each page
If you use a camera, and you don’t have some kind of remote trigger or interval-trigger at hand, you would need 2 people: someone who operates the camera, and another one who flips the pages. You can easily scan 1 double page every 2 seconds once you get more skilled in the process.
Here are the steps:
- Set the camera on a tripod and have it point vertically down. The distance between camera and book should be at least 1 meter to approximate orthagonal projection (imitates a flatbed scanner). Too much perspective projection would skew the text lines.
- Place the book directly under the camera - avoid pointing the camera at any non-90-degree angles that would cause perspective skewing of the contents. Later we will unskew the images, but the less skewing you get at this point, the better.
- Set up uniform lighting, as bright as you are able. Optimize lighting directions to minimize possible shadows (especially in the book fold). Don’t place the lights near the camera or it will cause reflections on paper or ink.
- Set the camera to manual mode. Use JPG format. Turn the camera flash off. All pictures need to have uniform exposure characteristics to make later digital processing easier.
- Maximize zoom so that a margin of about 1 cm around the book is still visible. This way, aligning of the book will take less time. The margin will be cropped later.
- Once zoom and camera position is finalized, mark the position of the book on the table with tape. After moving the book, place it back onto the original position with help of these marks.
- Take test pictures. Inspect and optimize the results by finding a balance between the following camera parameters:
- Minimize aperture size (high f/value) to get sharper images.
- Maximize ISO value to minimize exposure time so that wiggling of the camera has less of an effect. Bright lighting helps lowering ISO which helps reducing noise.
- Maximize resolution so that the letter size in the photos is at least 25 pixels tall. This will be important to increase the quality of the OCR step below, and you’ll need a good camera for this.
- Take one picture of each double page.
One double page of a book that will be digitized. This is actually a scan, but you also can use a good photo camera. Make sure that letters are at least 25 pixels tall. Note that the right page is slighty rotated.
Image Preprocessing
Let’s remember our goal: We want a PDF …
- which is searchable (the text should be selectable)
- whose file size is minimized
- has the same paper size as the original
- is clearly legible
The following steps are the preprocessing steps to accomplish this. We will use ImageMagick command line tools (available for all platforms) and a couple of other software, all available for Linux distributions.
A note on image formats
Your input files can be JPG or TIFF, or whatever format your scanner or camera support. However, this format must also be supported by ImageMagick. We’ll convert these images to black-and-white PBM images to save space and speed up further processing. PBM is a very simple, uncompressed image format that only stores 1 bit per pixel (2 colors). This image format can be embedded into the PDF directly, and it will be losslessly compressed extremely well, resulting in the smallest possible PDF size.
Find processing parameters by using just a single image
Before we will process all the images as a batch, we’ll just pick one image and find the right processing parameters. Copy one photograph into a new empty folder and do the following steps.
Converting to black and white
Suppose we have chosen one image in.JPG. Run:
convert -normalize -threshold 50% -brightness-contrast 0x10 in.JPG 1blackwhite.pbm
Inspect the generated 1blackwhite.pbm file. Optimize the parameters threshold (50% in above example), brightness (0 in above example), and contrast (10 in above example) for best legibiligy of the text.
Cropping away the margins
Next we will crop away the black borders so that the image will correspond to the paper size.
convert -crop 2400x2000+760+250 1blackwhite.pbm 2cropped.pbm
In this example, the cropped image will be a rectangle of 2400x2000 pixels, taken from the offset 760,250 of the input image. Inspect 2cropped.pbm until you get the parameters right, it will be some trial-and-error. The vertical book fold should be very close to the horizontal middle of the cropped image (important for next step).
Split double pages into single pages
convert +repage -crop 50%x100% +repage 2cropped.pbm split%04d.pbm
This will generate 2 images. Inspect split0001.pbm and split0002.pbm. You only can use 50% of horizontal cut, otherwise you’ll get more than 2 images.
Deskewing the image
Your text lines are probably not exactly horizontal (page angles, camera angles, perspective distortion, etc.). However, having exactly horizontal text lines is very important for accuracy of OCR software. We can deskew an image with the following command:
convert -deskew 40% split0001.pbm 3deskewed.pbm
Inspect the output file 3deskewed.pbm for best results.
Process all the images
Now that you’ve found the paramters that work for you, it’s simple to convert all of your images as a batch, by passing all the paramters at the same time to convert. Run the following in the folder where you stored all the JPG images (not in the folder where you did the previous single-image tests):
convert -normalize -threshold 50% -brightness-contrast 0x10 -crop 2400x2000+760+250 +repage -crop 50%x100% +repage -deskew 40% *.JPG book%04d.pbm
Now, for each .JPG input file, we’ll have two .pbm output files. Inspect all .pbm files and make manual corrections if needed.
Note: If you have black borders on the pages, consider using unpaper to remove them. I’ll save writing about using unpaper for a later time.
Producing OCR PDFs with text overlay
The tesseract OCR engine can generate PDFs with a selectable text layer directly from our PBM images. Since OCR is CPU intensive, we’ll make use of parallel processing on all of our CPU cores with the parallel tool. You can install both by running
apt-get install tesseract-ocr parallel
For each PBM file, create one PDF file:
find . -name '*.pbm' | parallel 'echo "Processing {}"; tesseract {} {.} pdf'
To merge all the PDF files into one, run pdfunite from the poppler-utils package:
pdfunite *.pdf book.pdf
Success! And this is our result: