Raspberry Pi2 and Pi3 running pure Debian and the Linux Mainline/Vanilla Kernel
Update 2017 Feb 25: I have updated the step-by-step instructions based on the suggested fixes and improvements contained in the reader comments. I also have copied the step-by-step instructions from this blog post to the README.md file hosted on https://github.com/michaelfranzl/rpi23-gen-image. From now on I will update the instructions only on github, so expect that the instructions in this blog post will grow slightly out of date.
Update 2017 Mar 4: 64 bit kernel and Debian OS now works on the RPi3.
Update 2018 May: Debian 10 “Buster” works, including wireless LAN on RPi3
Gallium graphics drivers for Raspberry Pi’s VC4 chip are now fully supported by Linux Mainline
This has been a long way coming. In February 2014, Broadcom announced that they would release the formerly closed-source drivers for the VideoCore IV (VC4) GPU of their BCM283x family of System-on-a-chip (SoC), powering Raspberry Pi’s.
To make a long story short, Eric Anholt started porting the Open Source drivers, as documented by this presentation early 2015, and contributed code to the Linux (Mainline) Kernel, libdrm, Mesa, and X.org. I’m sure it was a long and painful work. But the results are worth it. A picture says more than 1000 words:
To emphasize the point: It is no longer necessary to run specialized distributions (like Raspbian) or Linux kernels (like the Raspbian flavor) in order to have the Raspberry Pi well supported. And this is good news. Debian is a well established and maintained standard Distribution. And even though the Raspberry Pi is not powerful enough for the professional desktop user, it is powerful enough for the casual desktop user, and it is very small and cheap, which opens up a whole lot of possibities for new real-world applications.
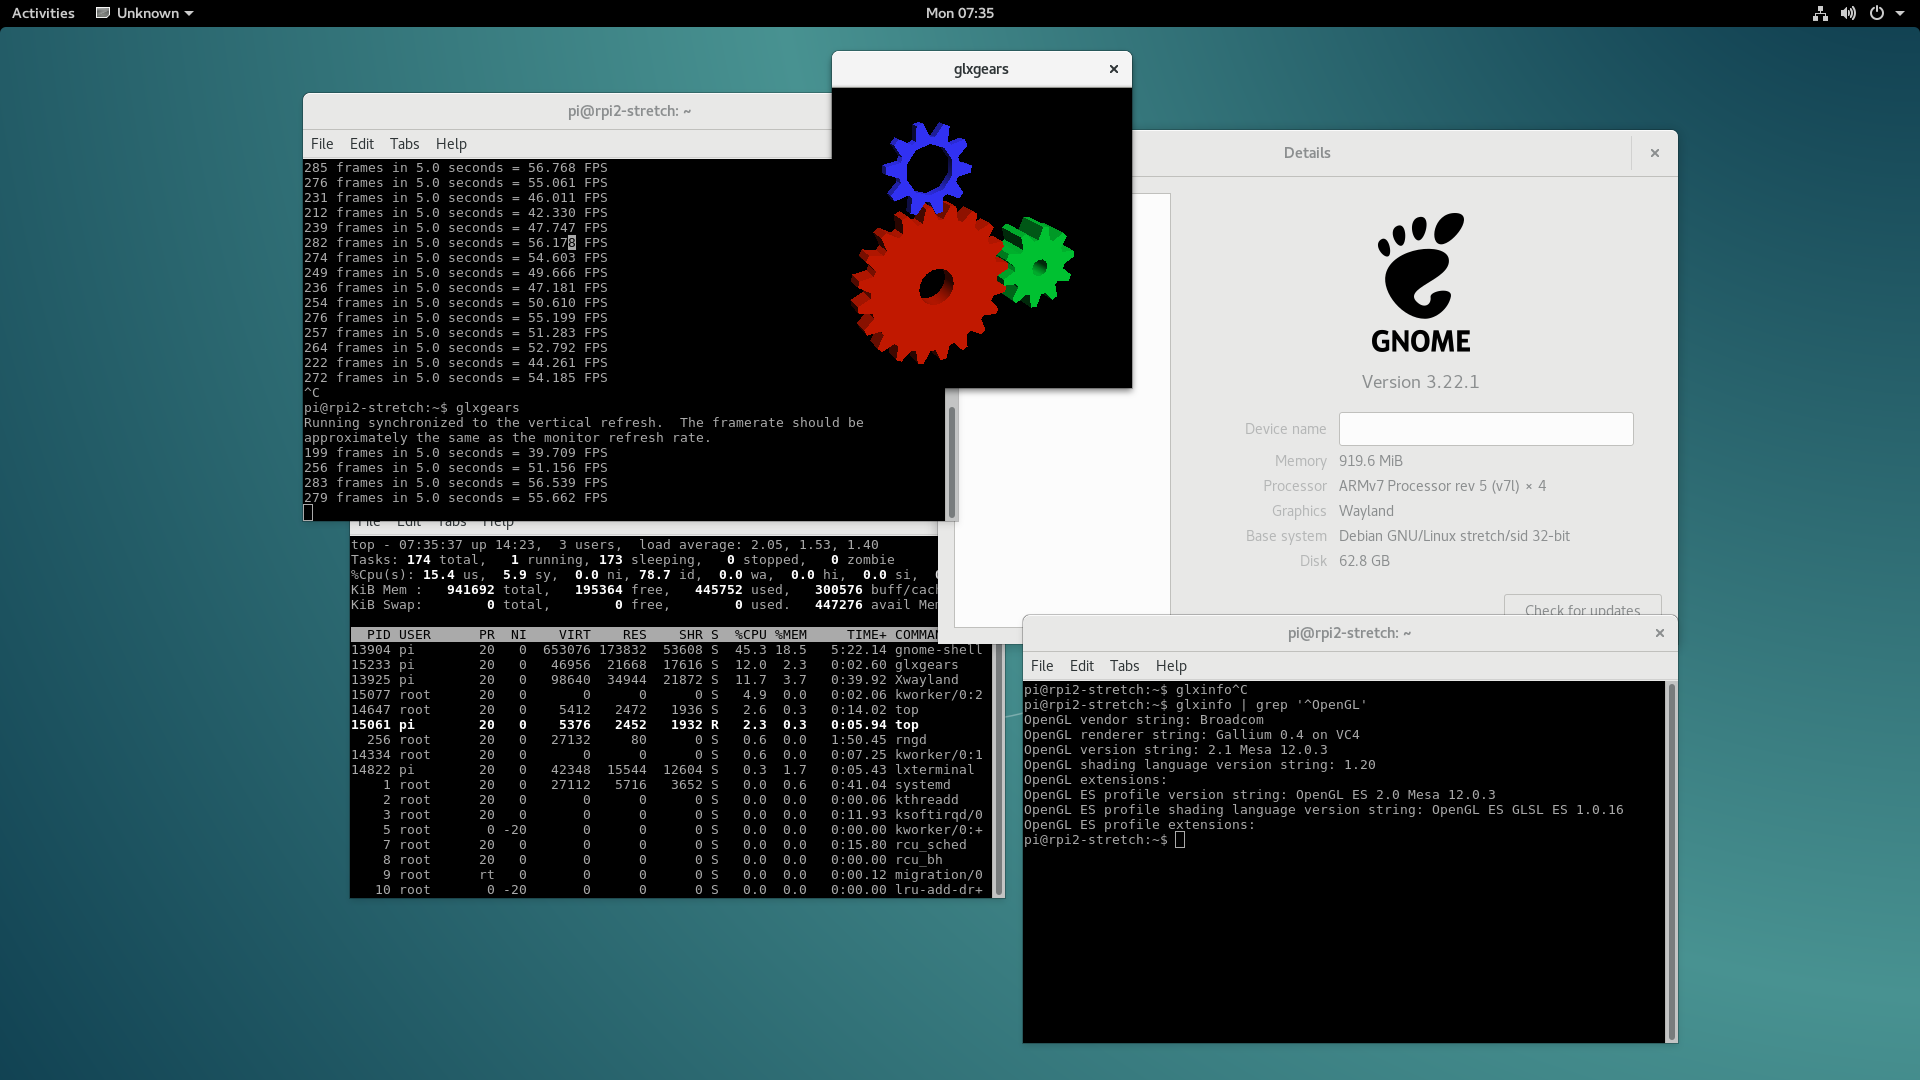
I ran an additional test: Gnome even runs on Wayland (modern replacement for the X Window System) on the Raspberry Pi 2 (and 3):
Remarks
It still is not a matter of a one-click installer to reproduce these results, you need some experience when you run into barriers. But it has gotten a whole lot easier. Github user drtyhlpr thankfully published the script rpi23-gen-image that can create a standard Debian distribution for the Raspberry Pi that can simply be copied to a SD card.
I have created a fork of this script to use the official Linux kernel instead of the Raspberry flavor one. Above screenshots are taken from a system that I’ve created with this script. My fork is developed into a slightly different direction:
- Only official Debian releases 9 (“Stretch”) and newer are supported.
- Only the official/mainline/vanilla Linux kernel is supported (not the raspberry flavor kernel).
- The Linux kernel must be pre-cross-compiled on the PC running this script (instructions below).
- Only U-Boot booting is supported.
- The U-Boot sources must be pre-downloaded and pre-cross-compiled on the PC running this script (instructions below).
- An apt caching proxy server must be installed to save bandwidth (instructions below).
- The installation of the system to an SD card is done by simple copying or rsyncing, rather than creating, shrinking and expanding file system images.
- The FBTURBO option is removed in favor or the working VC4 OpenGL drivers of the mainline Linux kernel.
All of these simplifications are aimed at higher bootstrapping speed and maintainability of the script. For example, we want to avoid testing of all of the following combinations:
RPi2 with u-boot, with official kernel
RPi2 without u-boot, with official kernel
RPi2 with u-boot, with raspberry kernel
RPi2 without u-boot, with raspberry kernel
RPi3 with u-boot, with official kernel
RPi3 without u-boot, with official kernel
RPi3 with u-boot, with raspberry kernel
RPi3 without u-boot, with raspberry kernel
Thus, the script only supports:
RPi2 with u-boot with official kernel
RPi3 with u-boot with official kernel
A RPi2 (setting RPI_MODEL=2) is well supported. It will run the arm architecture of Debian, and a 32-bit kernel. You should get very good results, see my related blog posts:
2016-10-31-raspberry-pi-debian-stretch
2016-11-10-setting-i2c-speed-raspberry-pi
2016-11-10-reading-cpu-temperature-raspberry-pi-mainline-linux-kernel
The newer RPi3 (setting RPI_MODEL=3) is supported too. It will run the arm64 architecture of Debian, and a 64-bit kernel. The support of this board by the Linux kernel will very likely improve over time.
In general, this script is EXPERIMENTAL. I do not provide ISO file system images. It is better to master the process rather than to rely on precompiled images. In this sense, use this project only for educational purposes.
How to do it
Basically, we will deboostrap a minimal Debian 9 (“Stretch”) system for the Raspberry on a regular PC running also Debian 9 (“Stretch”). Then we copy that system onto a SD card, then boot it on the Raspberry.
We will work with the following directories:
~/workspace
  |- rpi23-gen-image
  |- linux
  |- u-boot
  |- raspberry-firmware
Set up your working directory:
mkdir workspace
cd workspace
Do the following steps as root user.
Set up caching for apt
This way, you won’t have to re-download hundreds of megabytes of Debian packages from the Debian server every time you run the rpi23-gen-image script.
apt-get install apt-cacher-ng
Check its status page:
Install dependencies
The following list of Debian packages must be installed on the build system because they are essentially required for the bootstrapping process.
apt-get install debootstrap debian-archive-keyring qemu-user-static binfmt-support dosfstools rsync bmap-tools whois git bc device-tree-compiler
For a RPi2, you also need:
apt-get install crossbuild-essential-armhf
For a RPi3, you also need:
apt-get install crossbuild-essential-arm64
Kernel compilation
Get the latest Linux mainline kernel. This is a very large download, about 2GB. (For a smaller download of about 90 MB, consider downloading the latest stable kernel as .tar.xz from https://kernel.org.)
git clone https://git.kernel.org/pub/scm/linux/kernel/git/torvalds/linux.git
cd linux
Confirmed working revision (approx. version 4.10, Feb 2017): 60e8d3e11645a1b9c4197d9786df3894332c1685
git checkout 60e8d3e116
Working configuration files for this Linux kernel revision are included in this repository. (working-rpi2-linux-config.txt and working-rpi3-linux-config.txt).
If you want to generate the default .config file that is also working on the Raspberry, execute
make mrproper
For a RPi2:
make ARCH=arm CROSS_COMPILE=arm-linux-gnueabihf- multi_v7_defconfig
For a RPi3:
make ARCH=arm64 CROSS_COMPILE=aarch64-linux-gnu- defconfig
Whichever .config file you have at this point, if you want to get more control as to what is enabled in the kernel, you can run the graphical configuration tool at this point:
apt-get install libglib2.0-dev libgtk2.0-dev libglade2-dev
For a RPi2:
make ARCH=arm CROSS_COMPILE=arm-linux-gnueabihf- gconfig
For a RPi3:
make ARCH=arm64 CROSS_COMPILE=aarch64-linux-gnu- gconfig
Before compiling the kernel, back up your .config file so that you don’t lose it after the next make mrproper:
cp .config ../kernelconfig-backup.txt
Compiling the kernel
Clean the sources:
make mrproper
Optionally, copy your previously backed up .config:
cp ../kernelconfig-backup.txt .config
Find out how many CPU cores you have to speed up compilation:
NUM_CPU_CORES=$(grep -c processor /proc/cpuinfo)
Run the compilation on all CPU cores. This takes about 10 minutes on a modern PC:
For a RPi2:
make -j${NUM_CPU_CORES} ARCH=arm CROSS_COMPILE=arm-linux-gnueabihf-
For a RPi3:
make -j${NUM_CPU_CORES} ARCH=arm64 CROSS_COMPILE=aarch64-linux-gnu-
Verify that you have the required kernel image.
For a RPi2 this is:
./arch/arm/boot/zImage
For a RPi3 this is:
./arch/arm64/boot/Image.gz
U-Boot bootloader compilation
cd ..
git clone git://git.denx.de/u-boot.git
Confirmed working revision: b24cf8540a85a9bf97975aadd6a7542f166c78a3
git checkout b24cf8540a
Let’s increase the maximum kernel image size from the default (8 MB) to 64 MB. This way, u-boot will be able to boot even larger kernels. Edit ./u-boot/include/configs/rpi.h and add above the very last line (directly above “#endif”):
#define CONFIG_SYS_BOOTM_LEN (64 * 1024 * 1024)
Find out how many CPU cores you have to speed up compilation:
NUM_CPU_CORES=$(grep -c processor /proc/cpuinfo)
Compile for a RPi model 2 (32 bits):
make -j${NUM_CPU_CORES} ARCH=arm CROSS_COMPILE=arm-linux-gnueabihf- rpi_2_defconfig all
Compile for a RPi model 3 (64 bits):
make -j${NUM_CPU_CORES} ARCH=arm CROSS_COMPILE=aarch64-linux-gnu- rpi_3_defconfig all
Verify that you have the required bootloader file:
./u-boot.bin
Pre-download Raspberry firmware
The Raspberry Pi still needs some binary proprietary blobs for booting. Get them:
cd ..
mkdir -p raspberry-firmware/boot
cd raspberry-firmware/boot
wget https://github.com/raspberrypi/firmware/raw/master/boot/bootcode.bin
wget https://github.com/raspberrypi/firmware/raw/master/boot/fixup_cd.dat
wget https://github.com/raspberrypi/firmware/raw/master/boot/fixup.dat
wget https://github.com/raspberrypi/firmware/raw/master/boot/fixup_x.dat
wget https://github.com/raspberrypi/firmware/raw/master/boot/start_cd.elf
wget https://github.com/raspberrypi/firmware/raw/master/boot/start.elf
wget https://github.com/raspberrypi/firmware/raw/master/boot/start_x.elf
Confirmed working revision: bf5201e9682bf36370bc31d26b37fd4d84e1cfca
Build the system!
This is where you call the rpi23-gen-image.sh script.
cd ../..
git clone https://github.com/michaelfranzl/rpi23-gen-image.git
cd rpi23-gen-image
For example:
DEBIAN_RELEASE="stretch" \
USER_NAME="pi" \
PASSWORD="xxx" \
APT_INCLUDES="i2c-tools,rng-tools,avahi-daemon,rsync,vim" \
UBOOTSRC_DIR="$(pwd)/../u-boot" \
KERNELSRC_DIR="$(pwd)/../linux" \
RPI_MODEL=2 \
HOSTNAME="rpi2" \
RPI_FIRMWARE_DIR="$(pwd)/../raspberry-firmware" \
ENABLE_IPTABLES=true \
ENABLE_REDUCE=true \
REDUCE_SSHD=true \
./rpi23-gen-image.sh
You may want to modify the variables according to the section “Command-line parameters” below.
The file example.sh in my github repostory contains a working example.
Install the system on a SD card
Insert a SD card into the card reader of your host PC. You’ll need two partitions on it. I’ll leave as an exercise for the reader the creation of a partition table according to the following output of fdisk for a 64GB card:
Device         Boot  Start        End    Sectors    Size   Id  Type
/dev/mmcblk0p1        2048     500000     497953  243.1M    c  W95 FAT32 (LBA)
/dev/mmcblk0p2      501760   62552063   62050304   29.6G   83  Linux
The following commands will erase all contents of the SD card and install the system (copy via rsync) on the SD card:
umount /dev/mmcblk0p1
umount /dev/mmcblk0p2

mkfs.vfat /dev/mmcblk0p1
mkfs.ext4 /dev/mmcblk0p2

mkdir -p /mnt/raspcard

mount /dev/mmcblk0p2 /mnt/raspcard
mkdir -p /mnt/raspcard/boot/firmware
mount /dev/mmcblk0p1 /mnt/raspcard/boot/firmware

rsync -a ./images/stretch/build/chroot/ /mnt/raspcard

umount /dev/mmcblk0p1
umount /dev/mmcblk0p2
Note about SD cards: Cheap (or sometimes even professional) SD cards can be weird at times. I’ve repeatedly noticed corrupt/truncated files even after proper rsync and proper umount on different brand new SD cards. TODO: Add a method to verify all file checksums after rsync.
Try booting the Raspberry
Insert the SD card into the Raspberry Pi, and if everything went well, you should see a console-based login prompt on the screen. Login with the login details you’ve passed into the script (USER_NAME and PASSWORD).
Alternatively, if you have included “avahi-daemon” in your APT_INCLUDES, you don’t need a screen and keyboard and can simply log in via SSH from another computer, even without knowing the Rasberry’s dynamic/DHCP IP address (replace “hostname” and “username” with what you have set as USER_NAME and HOSTNAME above):
ssh username@hostname.local
Finishing touches directly on the Raspberry
Remember to change usernames, passwords, and SSH keys!
Check uber-low RAM usage
Running top shows that the freshly booted system uses only 23 MB out of the availabl 1GB RAM! Confirmed for both RPi2 and RPi3.
Network Time Synchronization
The Raspberry doesn’t have a real time clock. But the default systemd conveniently syncs time from the network. Check the output of timedatectl. Confirmed working for both RPi2 and RPi3.
Hardware Random Number Generator
The working device node is available at /dev/hwrng. Confirmed working for both RPi2 and RPi3.
I2C Bus
Also try I2C support:
apt-get install ic2-tools
i2cdetect -y 0
Confirmed working for both RPi2 and RPi3.
Test onboard LEDs
As of the kernel revision referenced above, this only works on the RPi2. The RPi3 has only the red PWR LED on all the time, but otherwise is working fine.
By default, the green onboard LED of the RPi blinks in a heartbeat pattern according to the system load (this is done by kernel feature LEDS_TRIGGER_HEARTBEAT).
To use the green ACT LED as an indicator for disc access, execute:
echo mmc0 > /sys/class/leds/ACT/trigger
To toggle the red PWR LED:
echo 0 > /sys/class/leds/PWR/brightness # Turn off
echo 1 > /sys/class/leds/PWR/brightness # Turn on
Or use the red PWR LED as heartbeat indicator (kernel option for this must be enabled):
echo heartbeat > /sys/class/leds/PWR/trigger
Notes about systemd
systemd now replaces decades-old low-level system administration tools. Here is a quick cheat sheet:
Reboot machine:
systemctl reboot
Halt machine (this actually turns off the RPi):
systemctl halt
Show all networking interfaces:
networkctl
Show status of the Ethernet adapter:
networkctl status eth0
Show status of the local DNS caching client:
systemctl status systemd-resolved
Install GUI
Successfully tested on the RPi2 and RPI3.
If you want to install a graphical user interface, I would suggest the light-weight LXDE window manager. Gnome is still too massive to run even on a GPU-accelerated Raspberry.
apt-get install lightdm lxde lxde-common task-lxde-desktop
Reboot, and you should be greeted by the LightDM greeter screen!
Test GPU acceleration via VC4 kernel driver
Successfully tested on the RPi2 and RPI3.
apt-get install mesa-utils
glxgears
glxinfo | grep '^OpenGL'
Glxinfo should output:
OpenGL vendor string: Broadcom
OpenGL renderer string: Gallium 0.4 on VC4
OpenGL version string: 2.1 Mesa 12.0.3
OpenGL shading language version string: 1.20
OpenGL ES profile version string: OpenGL ES 2.0 Mesa 12.0.3
OpenGL ES profile shading language version string: OpenGL ES GLSL ES 1.0.16
Kernel compilation directly on the Raspberry
Only successfully tested on the RPi2. Not yet tested on the RPI3.
In case you want to compile and deploy another Mainline Linux kernel directly on the Raspberry, proceed as described above, but you don’t need the ARCH and CROSS_COMPILE flags. Instead, you need the -fno-pic compiler flag for modules. The following is just the compilation step (configuration and installation omitted):
make -j5 CFLAGS_MODULE="-fno-pic"
make modules_install
Follow-up articles
2016-11-10-setting-i2c-speed-raspberry-pi
2016-11-10-reading-cpu-temperature-raspberry-pi-mainline-linux-kernel
2017-03-21-zero-client-boot-kernel-root-filesystem-network-raspberry-pi2-pi3