How to turn a Raspberry Pi into a Gateway to Mobile Phone Internet
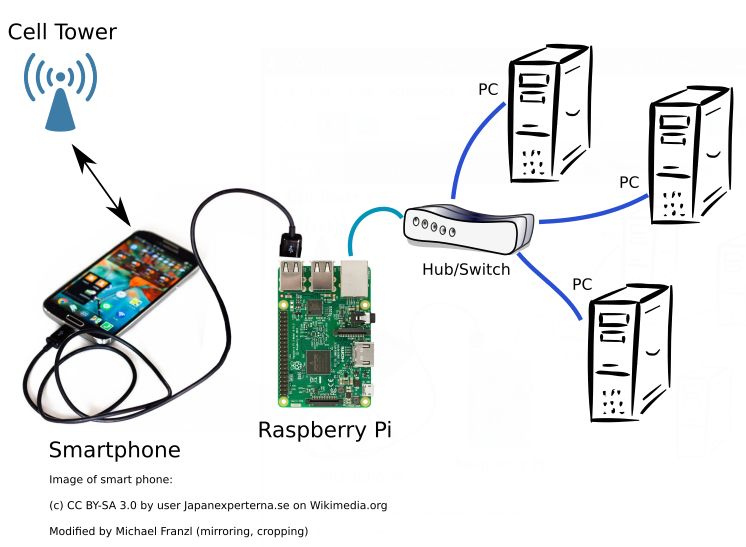
Your DSL internet connection is too slow? Want to set up an improvised office? You do not want to pay for a DSL internet plan when you already have a fast 4G mobile plan? If your answer is yes, it is quite easy to configure a Raspberry Pi to share one mobile internet connection to an Ethernet network.
Strictly speaking, you don’t have to use a Raspberry Pi to do this. A laptop or desktop computer with any Operating System would work too, but the Raspberry is so small and consumes only 2-3 W of electrical power, and is so cool (quite literally!), so will will make use of this awesomeness!
Prerequisites
The following step-by-step guide is based on a pure Debian 9 (“Stretch”) distribution with a mainline/vanilla/unpatched Linux kernel built according to my previous blog post:
- We will not focus on the Raspbian OS nor on any other distribution, because documentation for these other setups exists in abundance.
- You should not have a graphical interface installed. GUIs also install the NetworkManager service for systemd (Debian package “network-manager”), and I have not tested how NetworkManager interacts with the methods presented below. In addition, a bare-bone system is the preferred choice because it saves RAM and CPU resources.
- In any case, you should attach a keyboard and screen to the Raspberry because you may temporarily lose network connectivity during the setup.
- You also need a smart phone with an internet plan, supporting USB tethering. I have only tested recent Android based smartphones. Keep in mind during the following steps that, with most smart phones, you need to re-enable USB tethering after reboots or USB cable reconnects.
Goals
- Computers in the LAN will be able to set the Raspberry Pi’s static IP address as internet Gateway and DNS server.
- The Raspberry Pi will prefer a smart phone connection (tethered USB) to forward traffic.
- If the smart phone is disconnected, the Rasbperry Pi will automatically fall back to an already existing gateway if present (i.e. a DSL modem)
Step 1: Install a DNS server
This ensures that cached DNS lookups are very fast when a DNS query has already been fetched.
apt-get install bind9
Tell “bind” to use Google’s public DNS servers (they are good). Edit /etc/bind/named.conf.options and change the “forward” block to:
forwarders {
    8.8.8.8;
    8.8.4.4;
};
Restart “bind”:
systemctl restart bind9
Step 2: Configure a static IP address for the Ethernet adapter
If you already have a DHCP server running in your local network (we will use the subnet 192.168.0.0 in this guide), give the Raspberry Pi a free static IP address in this existing subnet, e.g. 192.168.0.250.
If you don’t have an existing DHCP server running in your local network, we will set one up on the Raspberry (see Step 8 below).
In both cases, we will give our Rasberry the static IP address 192.168.0.250. Using systemd, change the config file of your ethernet connection /etc/systemd/network/eth.network:
[Match]
Name=eth0

[Network]
Address=192.168.0.250/24
If your LAN already has an internet gateway, e.g. a DSL modem with address 192.168.0.1, add the following (optional) section to the same config file:
[Route]
Gateway=192.168.0.1
Metric=9000
The large positive integer value of “Metric” ensures that other configured gateways with a lower Metric will be preferred. This will come in handy in the next step where the smart phone will be our preferred gateway with a Metric value of 1024.
Now reboot the Raspberry or run systemctl restart systemd-networkd. You may lose network connectivity at this point if you are logged in via ssh.
Now, check that networkctl status eth0 matches our wanted static IP address:
Address: 192.168.0.250
Next, check the output of route -n (the kernel routing table). It should show:
Destination     Gateway         Genmask         Flags Metric Ref    Use Iface
192.168.0.0     0.0.0.0         255.255.255.0   U     0      0        0 eth0
If you have added the optional [Route] section, you should also see the following as first line, which is our current default route to the internet:
0.0.0.0 192.168.0.1 0.0.0.0 UG 9000 0 0 eth0
Step 3: Set the smart phone connection as gateway
Plug in your phone’s USB cable into one of the Raspberry’s USB connectors. Then turn on USB tethering in the Settings UI of your smart phone.
Run networkctl. You should see the following entry amongst the other network connections (notice “off” and “unmanaged”).
usb0 ether off unmanaged
To have the “systemd-networkd” service manage the “usb0” network device, create a file /etc/systemd/network/mobile.network with the following contents:
[Match]
Name=usb0

[Network]
DHCP=yes
To apply this config file, run systemctl restart systemd-networkd . After a few seconds, networkctl should output (notice the “routable” and “configured” parts):
3 usb0 ether routable configured
You also can check networkctl status usb0 to see the dynamic IP address obtained from the DHCP server on the smart phone. For Android phones this is usually in the subnet 42.
Next, check the output of route -n. Now, the phone connection “usb0” should be on the top of the list thanks to the lower metric of 1024:
Kernel IP routing table
Destination     Gateway         Genmask         Flags Metric Ref    Use Iface
0.0.0.0         192.168.42.129  0.0.0.0         UG    1024   0        0 usb0
0.0.0.0         192.168.0.1     0.0.0.0         UG    9000   0        0 eth0
192.168.0.0     0.0.0.0         255.255.255.0   U     0      0        0 eth0
192.168.42.0    0.0.0.0         255.255.255.0   U     0      0        0 usb0
192.168.42.129  0.0.0.0         255.255.255.255 UH    1024   0        0 usb0
Step 4: Check internet connectivity
With this routing table, we already can connect to the internet via the smart phone. To make sure that we are routed via the smart phone, we will ask the Linux kernel which gateway it would take first for traffic. ip route get 8.8.8.8 should ouput the IP address of the smart phone (192.168.42.129, subnet 42):
8.8.8.8 via 192.168.42.129 dev usb0 src 192.168.42.19
Let’s ping Google’s server a few times: ping 8.8.8.8 to see if we have an actual working route to the internet:
PING 8.8.8.8 (8.8.8.8) 56(84) bytes of data.
64 bytes from 8.8.8.8: icmp_seq=1 ttl=51 time=1742 ms
64 bytes from 8.8.8.8: icmp_seq=2 ttl=51 time=699 ms
The answer: Yes!
Check phone’s DNS server
Now let’s check if the phone’s DNS server is working. Type dig google.com (install Debian package “dnsutils” if not yet installed), and make sure that you’ve got an “ANSWER SECTION”:
;; ANSWER SECTION:
google.com.     2      IN      A  216.58.204.110

;; Query time: 567 msec
;; SERVER: 192.168.42.129#53(192.168.42.129)
Note that the response came from the phone’s IP. So, “systemd” has correctly configured the phone’s IP address as DNS server for the Raspberry (that information came from the phone’s DHCP server).
Run dig google.com again. This time the result should be cached and returned much faster (just 1ms):
...
;; Query time: 1 msec
Check local DNS server
Type dig @localhost google.com:
;; ANSWER SECTION:
google.com.     2      IN      A  216.58.204.110

;; Query time: 567 msec
;; SERVER: ::1#53(::1)
Note that this time, the response came from the “bind” DNS server which we have installed in Step 1. It, in turn, forwards queries via the phone connection. This server will be used for all requests via Ethernet.
Step 5: Turn on IP protocol forwarding for the Linux kernel
By default, this feature is turned off. Check the current status of this feature:
sysctl -a | grep net\.ipv4\.ip_forward will output:
net.ipv4.ip_forward = 0
To permanently set this variable to 1, create /etc/sysctl.d/30-ipforward.conf and add the following:
net.ipv4.ip_forward=1
Reload all settings by typing sysctl --system. Now, and also after a reboot, the “ip_forward” variable should stay enabled.
Step 6: Turn on Network address translation (NAT) aka. “Masquerading” between Ethernet and USB Smart Phone network links
Create a shell script /usr/bin/startgateway.sh with the following contents and make it executable (chmod a+x):
#!/bin/sh
iptables -t nat -A POSTROUTING -o usb0 -j MASQUERADE
iptables -A FORWARD -m conntrack --ctstate RELATED,ESTABLISHED -j ACCEPT
iptables -A FORWARD -i eth0 -o usb0 -j ACCEPT
This will masquerade IP packets coming in through the Ethernet adapter as if they were coming from the Raspberry itself, forward them to the USB smart phone connection, and the incoming answers (from remote servers) will be re-written and forwarded back to whereever in the LAN they came from. That is the central purpose of the problem we’re trying to solve in this tutorial.
Run this script. Check the output of iptables -L -n -v:
Chain INPUT (policy ACCEPT 63 packets, 6443 bytes)
pkts bytes target     prot opt in     out     source               destination

Chain FORWARD (policy ACCEPT 0 packets, 0 bytes)
pkts bytes target     prot opt in     out     source               destination
   0     0 ACCEPT     all  --  \*      \*       0.0.0.0/0            0.0.0.0/0            ctstate RELATED,ESTABLISHED
   0     0 ACCEPT     all  --  eth0 usb0      0.0.0.0/0            0.0.0.0/0

Chain OUTPUT (policy ACCEPT 23 packets, 3540 bytes)
pkts bytes target     prot opt in     out     source               destination
To run this shell script at system boot, right after the network links have been brought up, create the following systemd service file:
/etc/systemd/system/multi-user.target.wants/startgateway.service
Add the following:
[Unit]
Description=Start Gateway
After=network-online.target
Requires=network-online.target

[Service]
Type=oneshot
ExecStart=/usr/bin/startgateway.sh

[Install]
WantedBy=multi-user.target
Step 7: Test the Raspberry Gateway!
On another machine in your LAN (can be Linux, Windows or Mac), configure the Ethernet connection manually. Set the following:
- Static IP Address: 192.168.0.10 (or any other freely available address on this subnet)
- Gateway: 192.168.0.250
- DNS: 192.168.0.250
Then run traceroute 8.8.8.8 on that other machine. Truncated output:
1  gateway (192.168.0.250)
2  192.168.42.129
The route is correctly resolved. First traffic goes to the Raspberry Pi, then to the smart phone, and from there to the internet.
If you can’t run traceroute on that other machine, using a regular browser to browse the internet should work at this point!
Step 8: Running a DHCP server on the Raspberry
TODO
Conclusion
This tutorial may seem long, but the commands are few, and with a bit of practice you can turn your Raspberry Pi into a mobile phone Gateway in 10 minutes to enjoy faster 4G internet when your other modems are too slow.